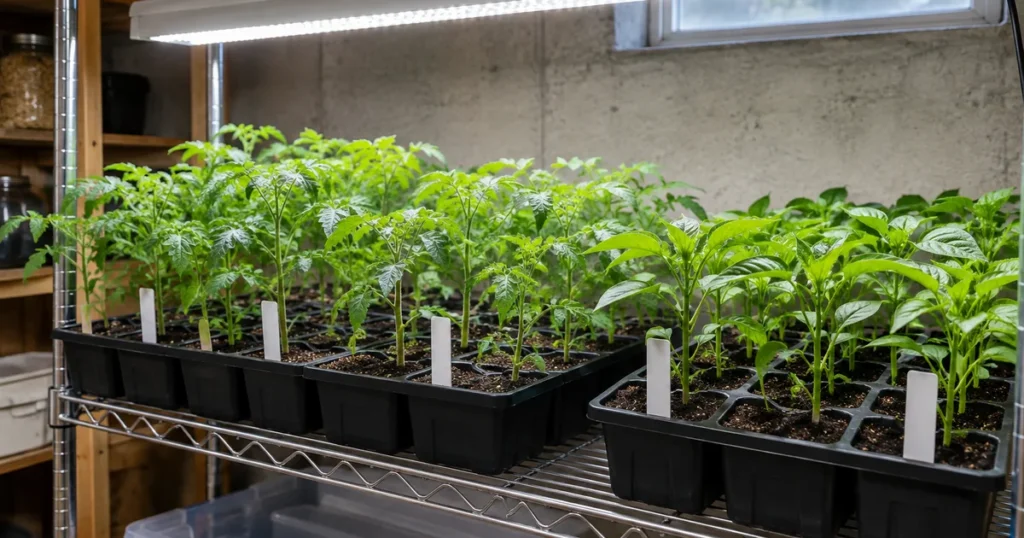
To start seeds indoors, sow them in clean containers filled with a sterile seed-starting mix, keep them warm and moist until they sprout, then grow them under bright light for 14-16 hours a day until they are ready to harden off and plant outside. Most vegetables need 4-10 weeks indoors, so timing is set by your average last frost date. Get the light, water and temperature right and you can grow stocky transplants of any variety you want for a fraction of nursery prices.
Quick answer
- Use a soilless seed-starting mix, never garden soil, in containers with drainage holes.
- Sow seeds 2-3 times as deep as they are wide, keep the mix evenly moist and around 70-80°F for warm-season crops.
- Once seedlings pop up, give them 14-16 hours of light a day with fluorescent tubes 2-4 inches above the leaves (LEDs per the maker’s chart).
- Feed at quarter strength once true leaves appear, run a fan for air movement, and pot up when roots fill the cell.
- Harden off for 1-2 weeks before transplanting into the garden.
In this guide
Want every planting date for your region in one place? Get The Year-Round Vegetable Garden (225 pages, $27).
Why start seeds indoors?
Starting seeds inside gives slow crops a head start. Tomatoes, peppers and eggplant need a long, warm season, and in zones 3-6 there are simply not enough frost-free days to grow them from seed sown outdoors. Starting them 6-10 weeks early means they go into the garden as sturdy plants ready to grow.
In zones 8-10, seed starting works on a different calendar. Long, hot summers make fall and winter the main season for broccoli, cabbage, lettuce and other cool-season crops, so many Southern gardeners start a second round of seeds indoors in late summer, out of the heat, and transplant in early fall.
You also get choice. Garden centers carry a few dozen common varieties, while seed catalogs list hundreds of tomatoes alone. And a packet of seeds costs about the same as one or two nursery plants.
What to start indoors vs direct sow
Not every crop belongs under lights. Root crops and large-seeded crops that grow fast usually do better sown right in the garden, because they dislike root disturbance or simply outgrow a pot in days.
| Start indoors | Either way (indoors in pots or direct sow) | Direct sow outdoors |
|---|---|---|
| Tomatoes, peppers, eggplant, tomatillos | Cucumbers, summer and winter squash, melons, watermelon | Beans, peas, sweet corn |
| Onions and leeks from seed | Lettuce, kale, collards, Swiss chard | Carrots, radishes, beets, turnips, parsnips |
| Broccoli, cabbage, cauliflower, Brussels sprouts | Basil, okra | Spinach, arugula, cilantro, dill |
| Celery, parsley | Kohlrabi, Asian greens | Potatoes and garlic (planted from tubers and cloves) |
Cucurbits (cucumbers, squash, melons) grow quickly and resent having their roots disturbed. If you start them indoors, sow them in individual fiber or paper pots only 3-4 weeks before planting out.
When should you start seeds indoors?
Count backward from your average last spring frost date. As a rule of thumb, onions, celery and peppers start 8-12 weeks before planting out, tomatoes and eggplant 6-8 weeks, cabbage-family crops 5-7 weeks, and cucumbers and squash only 3-4 weeks.
That puts the main tomato sowing in late March or early April in zones 3-4, mid-March in zone 5, early March in zone 6 and February in zone 7. In zones 8-10 the season runs earlier, and fall crops get a second round of seed starting in late summer. Our guide on when to start seeds indoors has a full crop-by-crop schedule and a zone table. Look up your date on our frost dates by zone page, then check with your local extension office, because a valley or a hilltop a few miles away can differ by two weeks.
Garden hack: Write each crop’s sowing date directly on the seed packet in marker, then file the packets by date in a shoebox. On any given weekend, you only have to grab the front packets and sow.
What you need to start seeds indoors
- Containers with drainage holes, at least 2 inches deep: cell trays, small pots, soil blocks or fiber pots.
- A solid tray without holes underneath to catch water and allow bottom watering.
- Seed-starting mix: a sterile, fine, soilless blend of peat or coir with vermiculite or perlite.
- A clear humidity dome or plastic wrap to hold moisture during germination.
- Bottom heat (a seedling heat mat) for peppers, eggplant and tomatoes, ideally with a thermostat.
- Lights: LED or fluorescent fixtures on an adjustable chain, plus an outlet timer.
- A small fan, labels, a waterproof marker, a spray bottle and a water-soluble fertilizer.
Gear that helps
- Seed starting kit (solid tray, 72-cell insert, humidity dome): Covers containers, bottom watering and germination humidity in one purchase
As an Amazon Associate we earn from qualifying purchases. Check current prices and reviews on Amazon.
Step-by-step: how to start seeds indoors
Step 1: Choose and clean your containers
Divided containers with one seedling per cell are easier to manage than open flats, because each plant keeps its own root ball at transplant time. For tomatoes, peppers and cabbage-family crops, 72-cell or 50-cell trays are a good middle ground. Reusing trays from last year? Wash them in soapy water, then dip them in a solution of 1 part chlorine bleach to 9 parts water and let them air-dry. Our seed starting trays guide compares cell trays, soil blocks and peat pots in detail.
Step 2: Fill with moistened seed-starting mix
Garden soil is too dense, drains poorly, and carries weed seeds and disease organisms. Use a soilless mix instead. Dry peat-based mix repels water, so pour it into a tub, add warm water a little at a time and stir until it feels like a wrung-out sponge: damp, but no water drips when you squeeze a handful.
Fill cells to the top, tap the tray on the table to settle the mix, and level it off without packing it down. See our seed starting mix guide for a simple DIY recipe.
Step 3: Sow at the right depth
The depth rule is simple: plant a seed 2-3 times as deep as it is wide. A tomato seed goes about 1/4 inch deep; a squash seed closer to 3/4 inch. Tiny seeds such as lettuce, celery and many flowers need light to germinate, so press them onto the surface and barely dust them with fine vermiculite.
Drop 2-3 seeds per cell (one for large, reliable seeds like squash), cover, and mist the surface. Label every row the moment you sow it, with crop, variety and date.
Step 4: Hold moisture with a humidity dome
Seeds need constant moisture to germinate. A clear dome or loose plastic wrap keeps the mix from drying out on the surface. Check daily: if the mix looks lighter in color, mist it or add a little water to the bottom tray.
Take the dome off as soon as most seedlings have emerged. Leaving it on traps humidity around young stems and invites fungal disease.
Step 5: Add bottom heat for warm-season crops
Germination speed depends on the temperature of the mix, not the room. Most vegetable seeds germinate well when the mix sits around 70-80°F, and tomatoes, peppers and eggplant do best in the upper part of that range. A cool basement at 60°F can stretch pepper germination from about 10 days to three weeks or more.
A seedling heat mat set to about 70-80°F solves this. University of Maine Extension advises removing the tray from bottom heat once roughly half the seeds have sprouted. Cool-season crops such as lettuce and cabbage germinate fine at normal room temperature.
Step 6: Give seedlings strong light right away
The moment the first sprouts break the surface, they need bright light, or they stretch toward it within a day or two. A sunny window is rarely enough in February or March: light is weaker, days are short, and seedlings lean and get spindly.
Use grow lights on a timer for 14-16 hours a day, and give plants at least 8 hours of darkness. Fluorescent tubes (T5 or T8) work best only 2-4 inches above the leaves, because their intensity drops fast with distance. LED fixtures vary widely in output, so follow the manufacturer’s height chart and adjust from there. Raise the lights as the seedlings grow. Our grow lights for seedlings guide covers setups and distances by light type.
Watch out: Leggy seedlings, with long pale stems and leaves far apart, almost always mean too little light, often combined with a room that is too warm. Lower the lights before you change anything else. Our article on leggy seedlings explains how to rescue them.
Step 7: Water from the bottom
Pour about 1 inch of water into the solid tray under the cells and let the mix soak it up for 10-20 minutes, then pour off what remains. Bottom watering keeps the surface drier, which discourages damping-off and fungus gnats, and it does not knock over tiny seedlings.
Water when the cells feel noticeably lighter when you lift the tray, and before the mix pulls away from the cell walls. Constantly soggy mix is a bigger danger than slightly dry mix.
Step 8: Keep seedlings cool and growing
Once they are up, seedlings grow stockier at cooler temperatures than they needed to germinate. Aim for about 65-70°F during the day and roughly 10°F cooler at night. Cool-season crops like broccoli and lettuce are happy even cooler, around 55-65°F.
Step 9: Thin to one seedling per cell
When seedlings have their first true leaves (the second set, which look like the plant’s mature leaves), keep the strongest one in each cell. Snip the others at the soil line with small scissors. Pulling them out tears the roots of the one you want to keep.
Step 10: Feed at quarter strength
Seed-starting mixes hold little or no fertilizer. Once true leaves appear, feed with a general-purpose water-soluble fertilizer mixed at quarter strength once a week, as University of Minnesota Extension recommends. Over-feeding young plants leads to soft growth and salt burn on roots.
Step 11: Run a fan for air movement
A small oscillating fan on low, a few feet away, makes seedlings sway gently for a few hours a day. The movement builds thicker stems, and the moving air dries leaf surfaces and the top of the mix, which helps prevent damping-off. Brushing your palm lightly over the tops of the seedlings once or twice a day has a similar effect.
Step 12: Pot up when roots fill the cell
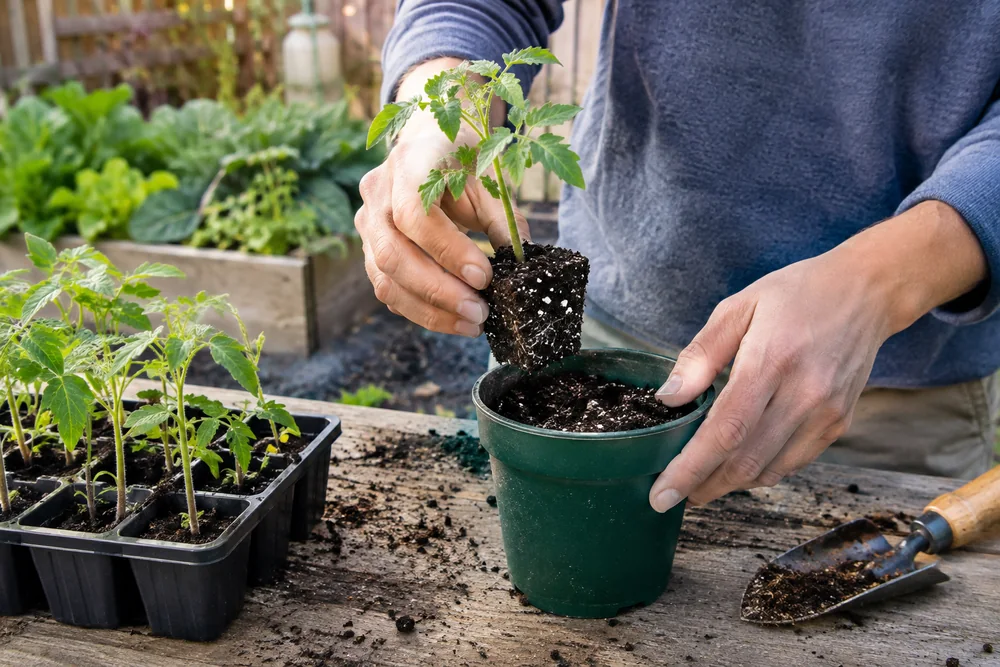
If leaves of neighboring plants overlap or white roots circle the bottom of the cell, it is time to move up. Transplant into a container 1-2 inches wider than the cell, such as a 3-4 inch pot. Handle seedlings by a leaf, never by the stem, which bruises easily.
Tomatoes can go deeper than they grew before, up to their lowest leaves, because they root along buried stem. Most other crops should sit at the same depth they grew in the cell.
Garden hack: When you start tomatoes, sow a few more seeds than you need and pot up only the best. Stocky plants with dark green leaves and short spaces between leaves always outperform the tallest ones in the tray.
Step 13: Harden off seedlings
Plants raised indoors have never felt sun, wind or cool nights. Moving them straight outside can scorch the leaves and stall growth for weeks. Starting 1-2 weeks before your planting date, set them outside in a sheltered, shady spot for a few hours, then gradually increase the time and the sun exposure each day.
Bring warm-season crops in whenever nights drop below about 50°F, and keep all seedlings out of temperatures below 45°F until they are fully hardened. Our step-by-step hardening off seedlings guide includes a day-by-day schedule.
Step 14: Transplant into the garden
Plant cool-season crops like broccoli and cabbage 2-4 weeks before your last frost. Wait until the danger of frost is past and nights stay above about 50°F for tomatoes, peppers, eggplant and cucurbits. A calm, cloudy afternoon is ideal.
Water the seedlings an hour before planting. Dig a hole about twice as wide as the root ball, set the plant in, firm the soil and water well. If you used peat pots, tear off the rim above the soil line so it cannot wick moisture away from the roots.
The Year-Round Vegetable Garden (2027 Edition)
Plan the whole season in one place: a 225-page month-by-month guide with calendars for six US growing regions, 50 plant profiles (tomatoes included), 5 copy-ready garden plans and 7 printable pages.
Tomato lover? Add Tomato Mastery, our seed-to-harvest tomato blueprint, for just $10 at checkout.
Get the guide ($27)Gear that helps
- Seedling heat mat with thermostat: Speeds germination of tomatoes, peppers and eggplant in a cool house
As an Amazon Associate we earn from qualifying purchases. Check current prices and reviews on Amazon.
Starting tomato seeds indoors
Tomatoes are the crop most home gardeners start first, and they are forgiving. Sow 6-8 weeks before your planting-out date, about 1/4 inch deep, and keep the mix around 75-85°F with a heat mat. Most varieties sprout in 5-12 days.
Move seedlings under lights immediately, then grow them at 65-75°F. Pot up into 3-4 inch pots when they have two sets of true leaves, burying the stem to just under the first leaves. Plant out 1-2 weeks after your last frost date, once the soil has warmed. A tomato that is 6-10 inches tall, stocky and dark green, with no flowers yet, is the ideal transplant.
Gear that helps
- LED grow light shop light 4 ft: Prevents leggy seedlings; the most important upgrade for indoor seed starting
As an Amazon Associate we earn from qualifying purchases. Check current prices and reviews on Amazon.
Troubleshooting seedling problems
| Problem | Likely cause | Fix |
|---|---|---|
| Seeds never sprout | Mix too cold, too wet or too dry, seed sown too deep, old seed | Use a heat mat, keep the mix evenly moist, follow the 2-3x depth rule, test old seed on a damp paper towel |
| Tall, pale, floppy seedlings | Not enough light, light too far away, room too warm | Lower lights, run them 14-16 hours, cool the room, pot up deeper (tomatoes) |
| Seedlings collapse at the soil line | Damping-off fungi in wet, stagnant conditions | Remove affected cells, sterile mix and clean trays next time, bottom water, run a fan, remove the dome |
| White fuzz or green film on the mix | Surface staying wet, poor air movement | Let the top dry between waterings, add airflow, scrape off growth |
| Small black flies around trays | Fungus gnats breeding in wet mix | Water less often and from below, use yellow sticky cards |
| Lower leaves turning yellow | Hungry seedlings or overwatering | Start quarter-strength feeding, let the mix dry slightly between waterings |
| Purple undersides on tomato leaves | Cool temperatures limiting phosphorus uptake | Warm the growing area a few degrees; usually fades once plants grow |
| White or bleached patches on leaves | Sunscald after going outside too fast, or a very strong light too close | Slow down hardening off, raise the light |
| Seed coat stuck on the leaves | Mix surface dried out during emergence | Mist it to soften it and let it fall off; do not pull |
Gear that helps
- Small clip-on oscillating fan: Gentle air movement strengthens stems and reduces damping-off
As an Amazon Associate we earn from qualifying purchases. Check current prices and reviews on Amazon.
Common mistakes to avoid
- Starting too early. Tomatoes sown in January in zone 5 become root-bound giants by planting time. Follow the weeks-before-frost guide.
- Using garden soil or old potting mix from last year’s containers. It compacts and can carry disease.
- Relying on a windowsill. Seedlings stretch and lean. Supplemental light makes the biggest difference of anything you can buy.
- Overwatering. Soggy mix starves roots of oxygen and is the top cause of damping-off.
- Leaving the dome on after seedlings emerge, or leaving them on the heat mat for weeks.
- Feeding full strength too early, which burns tender roots.
- Skipping hardening off. It is the most common reason healthy seedlings fail in their first week outside.
FAQ
How long do seedlings stay indoors before transplanting?
Most vegetables spend 4-10 weeks indoors. Cucumbers and squash need only 3-4 weeks, tomatoes 6-8, and peppers, onions and celery 8-12.
Do seeds need light to germinate?
Most vegetable seeds germinate in the dark, but a few, such as lettuce and celery, need light. Sow those on the surface. All seedlings need bright light as soon as they emerge.
Can I start seeds indoors without grow lights?
You can use a bright south-facing window, but seedlings usually stretch and lean in late winter. An inexpensive LED shop light on a timer gives much sturdier plants.
How often should I water seedlings?
Water when the tray feels light and the surface starts to look dry, typically every 1-3 days. Bottom watering for 10-20 minutes is the safest method.
When should I start fertilizing seedlings?
Begin when the first true leaves appear. Use a water-soluble fertilizer at quarter strength once a week.
Should I put a fan on my seedlings?
Yes. A fan on low for a few hours a day strengthens stems and reduces damping-off by keeping air and the mix surface from staying damp.
Sources
- Starting seeds indoors – University of Minnesota Extension
- Starting Seeds Indoors – Clemson Cooperative Extension, Home & Garden Information Center
- Bulletin #2751, Starting Seeds at Home – University of Maine Cooperative Extension
- Starting Vegetable Seeds Indoors: Seedling Culture and Transplanting – Utah State University Extension
- Starting Plants Indoors From Seeds – University of Missouri Extension
- Indoor Vegetable Seed Starting – Cornell Cooperative Extension Seneca County
- When should you remove the bottom heat when starting seeds indoors? – University of Maine Cooperative Extension